
One of Stardew Valley’s most famous features is the museum located in Pelican Town, just south of the Blacksmith. That’s where, early on in the game, you’ll find Gunther, the museum’s curator, who asks the player to improve the barebones establishment with much-needed items to be donated.
Obviously, when you first arrive, there is nothing there. However, as you progress through Stardew Valley’s many demands, the museum will eventually require some layout reviewing, since there is only so much space available to house all the artifacts and minerals you find.
Luckily, because this feature became extremely popular among purists and architecture enthusiasts, Stardew Valley best museum layout suggestions have quickly spread throughout the internet. That comes as no surprise, considering the game was already regarded as one of the most influential independent projects in gaming before Chucklefish stepped in for its international publishing.
We managed to find some of the most interesting layouts and learn what makes them stand out, so we’ve put together a guide to help you create your own place.
Tips to Get the Best Stardew Valley Museum Layout
Cluster Everything in Themes

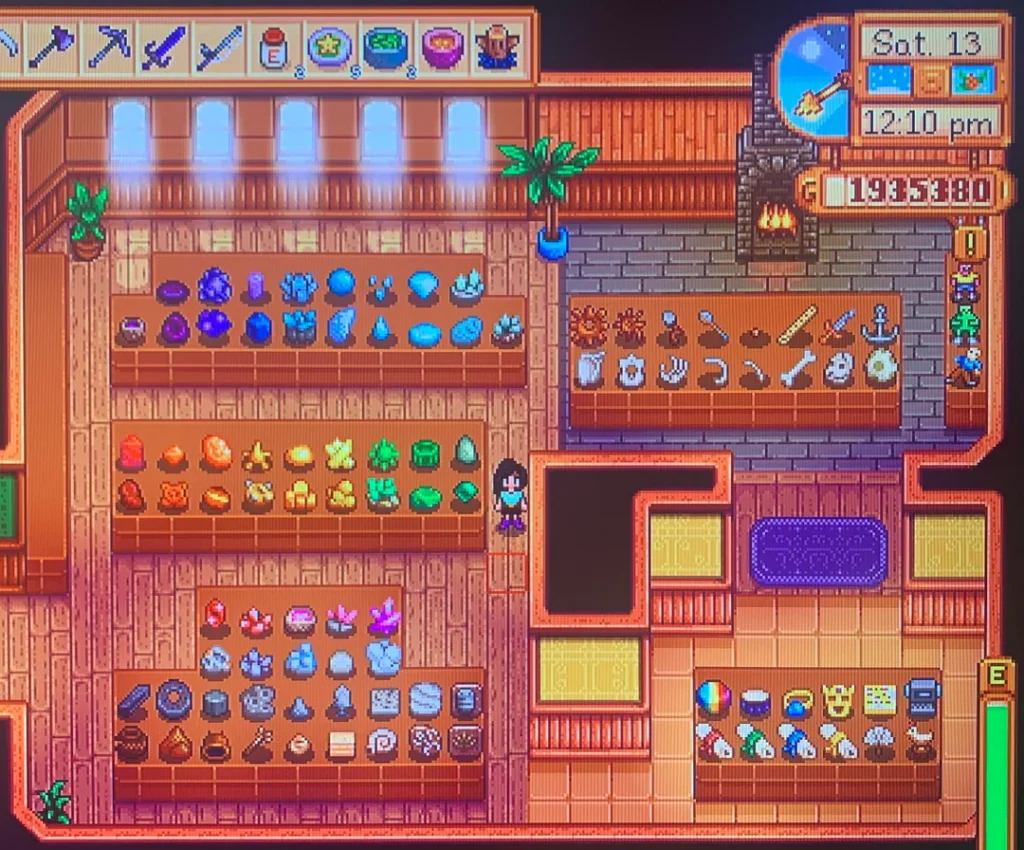
One of the most used Stardew Valley museum layouts is the thematic cluster model. It sounds much more complex than it really is, since we’re basically talking about grouping things together by their nature, setting the proper atmosphere for your displays.
For instance, you can place all four Dwarf Scrolls in sequential Roman numeral order (I, II, III, IV) side-by-side. Flanking these with the Dwarvish Helm and the glowing Dwarf Gadget emphasizes a clear technological lineage associated with the subterranean inhabitants of the Mines.
Another good example is the Prehistoric Biology scheme, which prioritizes the assembly of the multi-part Sloth Skeleton. This exhibit should ideally group the Skull, Hand, Scapula, Rib, Vertebra, Tibia, and Tail to form a cohesive skeletal reconstruction. Placing the Dinosaur Egg or other predatory remains nearby adds narrative depth, as items like the Prehistoric Rib feature “gouge marks” implying they were once a predator’s meal.
The Rainbow Gradient

If you want striking visuals and heavy color play, look no further than the ever-popular Rainbow layout. Widely considered the most visually arresting strategy, it takes advantage of mineral collection displays to show impressive colored showcases.
That’s because the minerals are all named after the color they take for — Ruby, Emerald, Aquamarine and the like — and they all possess vibrant, saturated hues, allowing them to be arranged in a way that calls attention to these visual schemes. And the “rainbow” part comes from the form you arrange them, with most players starting with red minerals, then orange, yellow and greens, before switching to blues and purples, just like a rainbow.
If you really want to drive the visual aspect home, you should also consider using the Prismatic Shard mineral, which, when placed at the center of the display, serves as a point of overlap between all different colors.
Era-Based Layout

One very easy-to-use layout is the one players took to calling “Narrative Journey”. Much like many museums in real life, this Stardew Valley museum layout is based entirely on the age of the item displayed — or rather, its perceived age, since the game does not give that information directly.
Items like the Rusty Spoon, which the game describes as a plain old spoon that is probably only ten years old, lets you start a showcase that goes deeper and deeper as you progress through the ages, including middle-era artifacts like the Elvish Jewelry and the Ornamental Fan, which suggest the Valley was a popular sixth-era vacation spot for the wealthy; and progressing/regressing to the Rare Disc, which the game tells you it brings a “sense of dread” and gives of the exploration vibe.
The funny thing about the Narrative Journey is that it is dual-fold: you can start from earliest to most recent or the other way around, it all depending on how you want to tell a story.
Regional Exhibits

For players who view the museum as a record of their travels, the Provenance model organizes items by their discovery location. This results in distinct “Regional Exhibits”, such as a Desert Exhibit housing the Golden Mask, Golden Relic, and Star Shards found in the Calico Desert. Similarly, an Oceanic Exhibit should feature the Anchor, Dried Starfish, and Glass Shards found exclusively along the shoreline.
The Subterranean Exhibit focuses on items found deep in the Mines or Skull Cavern, such as Fire Quartz and the Shadow Brute-dropped Rare Disc. This arrangement is highly functional for tracking which areas of the game world have been “exhausted” of their secrets and which regions require more exploration. Curators can quickly identify missing pieces by recognizing which regional display still has an empty slot or “planned gap”.
Things You Need to Know About the Stardew Valley Museum
Successfully curating the museum in Stardew Valley requires a balance between understanding the game’s internal mechanics and implementing strategic organizational philosophies. In layman’s terms, you’re not simply putting things in shelves, but also establishing context within showcases.
These require good navigation through grid limitations, platform-specific interface challenges, and the mechanical inventory lock that can hinder large-scale redesigns. The following essential tips summarize the most critical factors for transforming Gunther’s 300-tile hall into a structured, visually appealing narrative of the Valley’s history.
- The “Unreachable Six” Dead Zone: The large central display table contains a 3×2 interior block of tiles that are unreachable for interaction once the placement interface is closed. Items placed in this “dead zone” cannot be right-clicked to read their descriptions, so professional curators typically leave these spots empty or use them for common, repetitive minerals that do not require explanation.
- The Rearrange Notepad: You do not need a new item to donate to reorganize your collection; clicking the small notepad or clipboard located to the left of Gunther’s desk enters “Rearrange Mode” at any time. This mode allows you to click and drag items to empty slots or swap two items directly by dragging one specimen over another.
- The Donation Inventory Lock: A common mechanical hurdle occurs if you attempt to rearrange the museum while holding a donatable item in your active inventory, as the system will often default to the donation screen and block movement of existing items. It is highly recommended to clear your inventory of any new specimens before beginning a large-scale reorganization to ensure the interface remains fully functional.
- Platform-Specific Workarounds: On mobile versions, the user interface may block the bottom-most row of cases, necessitating the use of the notepad to trigger a centered “Rearrange Mode” view. Console players should disable “Controller Style Menus” in the settings to enable a free-moving cursor, which makes diagonal selections and precise organization significantly easier.
- Strategic Negative Space (Planned Gaps): Because there are 300 potential display spots for only 95 unique items, you have a significant surplus of space. Utilizing “Planned Gaps”—pre-designating empty sections for missing items like a “Dwarf Shelf”—creates a visual checklist that helps you quickly identify which specific artifacts or minerals you still need to find.
- Atmospheric Reintegration: Expert curators often enhance the hall’s ambiance by placing Gunther’s rewards back into the museum. The Skeleton Statue serves as an ideal centerpiece for a bone gallery, while items like the Singing Stone or Obsidian Vase can be used to anchor the corners of a gemstone wing to create a curated, luxury atmosphere.
- The Shed Museum Meta: If the public museum feels too restrictive, many players build a Big Shed on their farm to serve as a private gallery. This allows for the use of End Tables as pedestals to display duplicate artifacts or items Gunther will not accept, such as legendary fish, rare weapons, and unique festival trophies.
Stardew Valley was originally released on Windows in 2016 before being ported to Linux, macOS, PlayStation 4, Xbox One, Nintendo Switch, PlayStation Vita, iOS, Android and Nintendo Switch 2.

